> ## Documentation Index
> Fetch the complete documentation index at: https://docs.hasmcp.com/llms.txt
> Use this file to discover all available pages before exploring further.
# Create a Gmail Client MCP Server From Scratch
> Build a Gmail MCP server using HasMCP with OAuth2, and request/response interceptors.
In this tutorial, you will build a fully functional Gmail MCP server to search, read, and send emails. We will use **HasMCP**'s native OAuth2 support to handle authentication securely.
Unlike previous tutorials, we will not rely entirely on the LLM's intelligence
to handle data formatting, and will request/response interceptors to optimize
token usage and handle complex scenarios like base64 encoding.
## Prerequisites
You'll need the following to get started:
A HasMCP Cloud or Self-hosted account.
A Google Cloud Platform (GCP) account to obtain OAuth2 credentials.
***
## Step 1: Obtain Google OAuth2 Credentials
To secure the connection between HasMCP and your Gmail account, you must create an OAuth2 client ID.
**Create a Project**:
* Go to the [Google Cloud Console](https://console.cloud.google.com/).
* Create a new project named "HasMCP Gmail".
**Enable Gmail API**:
* Navigate to **APIs & Services > Library**.
* Search for "Gmail API" and click **Enable**.
**Configure Consent Screen**:
* Go to **APIs & Services > OAuth consent screen**.
* Select **External** (unless using a Workspace org) and click **Create**.
* Enter an App Name (e.g., "HasMCP") and Support Email.
* **Important**: Add the following **Scopes**:
* `https://www.googleapis.com/auth/gmail.readonly`
* `https://www.googleapis.com/auth/gmail.compose`
* Add your own email address as a **Test User**.
**Create Credentials**:
* Go to **APIs & Services > Credentials**.
* Click **Create Credentials > OAuth client ID**.
* Select **Web application**.
* **Authorized Redirect URIs**: Enter `https://app.hasmcp.com/oauth2/callback` (Confirm this URI in your HasMCP Provider settings).
* Click **Create**.
* **Copy the Client ID and Client Secret**.
***
## Step 2: Configure the Gmail Provider
In HasMCP, go to **Providers** > **Add Provider**.
Configure the settings:
* **Name**: `gmail`
* **Provider Type**: `REST`
* **Base URL**: `https://www.googleapis.com/gmail/v1`
* **Authentication**: Toggle on **OAuth2**.
Enter the OAuth details:
* **Authorization URL**: `https://accounts.google.com/o/oauth2/auth`
* **Token URL**: `https://oauth2.googleapis.com/token`
* **Client ID**: *Paste your Client ID*
* **Client Secret**: *Paste your Client Secret*
Click **Save Changes**.
***
## Step 3: Define Tools
We will create three tools. We will define the API endpoints and use interceptors to optimize the response and transform the request for complex scenarios.
* **Method**: `GET`
* **Path**: `/users/me/messages`
* **Name**: `searchEmails`
* **Description**: `Search for emails. Use 'q' for query (e.g., 'from:alice').`
* **Query Arguments**:
* `q` (Required): The search query string.
* **Headers**: `Authorization` `Bearer ${GOOGLEAPIS_COM_GMAIL_ACCESS_TOKEN}`
* **Scopes**: `https://www.googleapis.com/auth/gmail.readonly`
* **Method**: `GET`
* **Path**: `/users/me/messages/{id}`
* **Name**: `readEmail`
* **Description**: `Read email message`
* **Headers**: `Authorization` `Bearer ${GOOGLEAPIS_COM_GMAIL_ACCESS_TOKEN}`
* **Path Variables**:
* `id` (Auto-detected): The message ID.
* **Scopes**: `https://www.googleapis.com/auth/gmail.readonly`
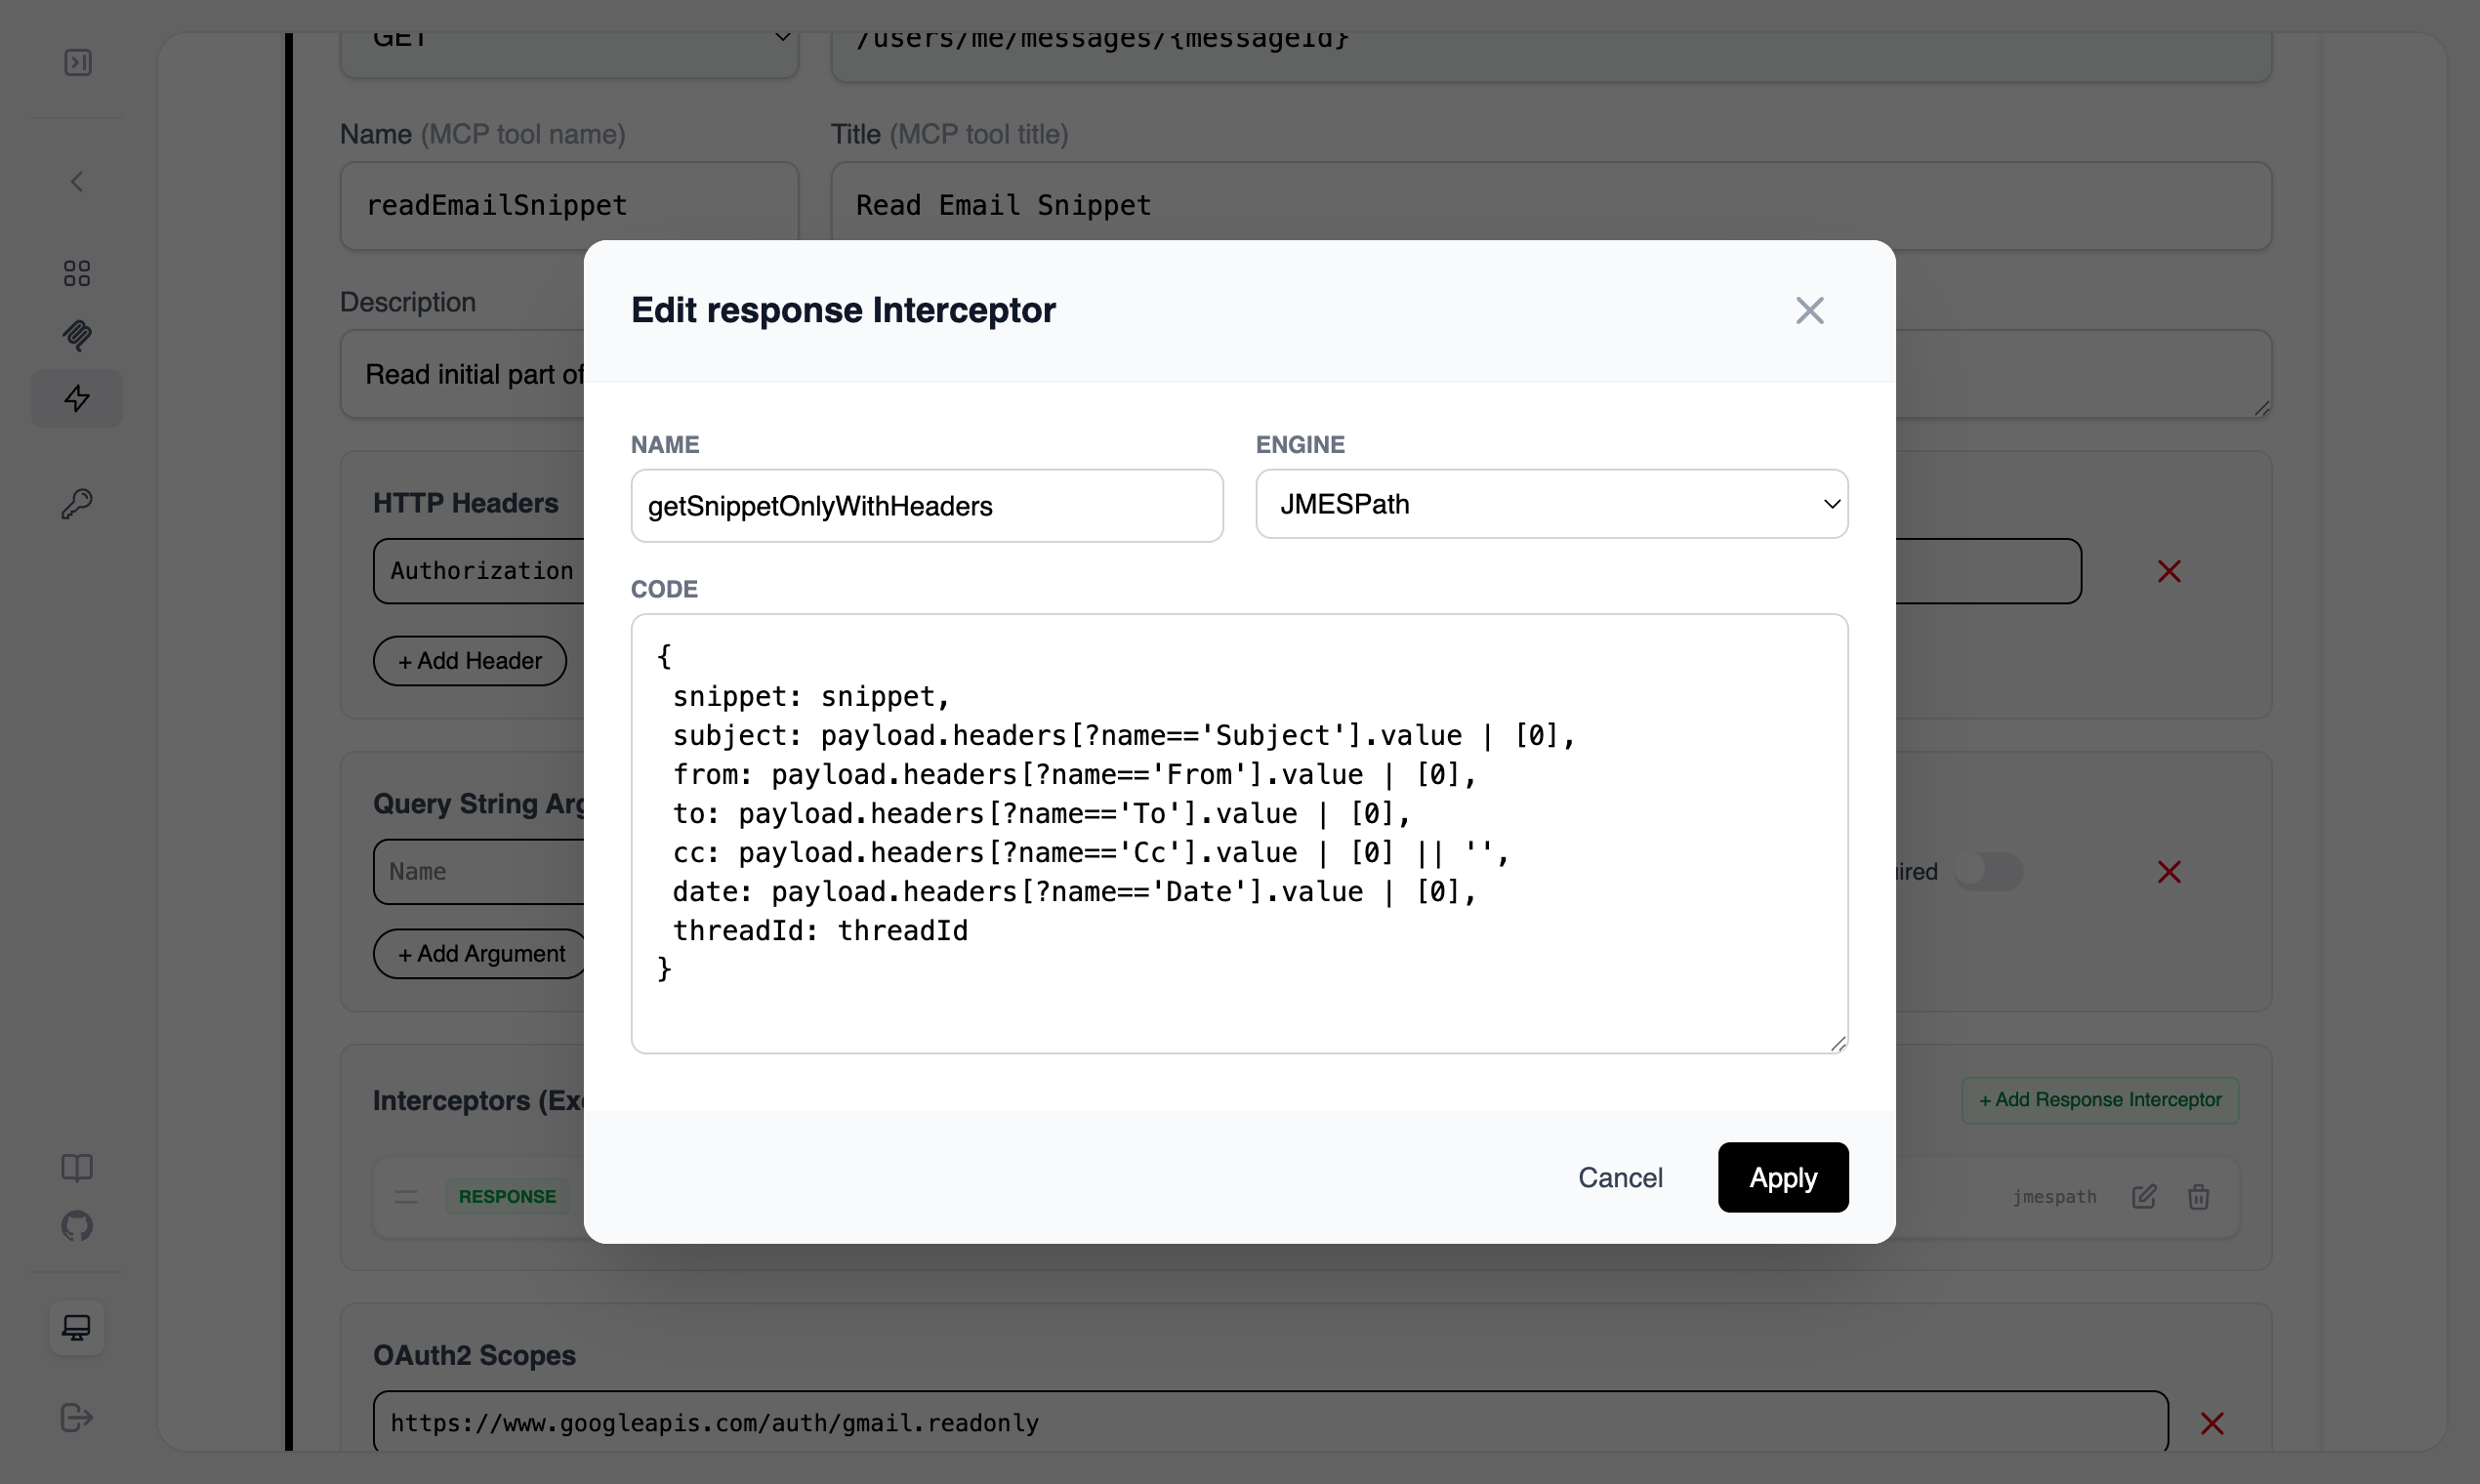
* **Response Interceptors**: This step is optional but highly recommended for optimizing MCP tool token usages. In this
example Gmail API returns a lot of headers we cherrypick the ones that we need only.
 ```json theme={null}
{
snippet: snippet,
subject: payload.headers[?name=='Subject'].value | [0],
from: payload.headers[?name=='From'].value | [0],
to: payload.headers[?name=='To'].value | [0],
cc: payload.headers[?name=='Cc'].value | [0] || '',
date: payload.headers[?name=='Date'].value | [0],
threadId: threadId
}
```
* **Method**: `POST`
* **Path**: `/users/me/messages/send`
* **Name**: `sendEmail`
* **Description**: `Send an email.`
* **Body**: Enter the following **JSON Payload**.
```json theme={null}
{
"$schema": "http://json-schema.org/draft-07/schema#",
"title": "Email Schema",
"type": "object",
"properties": {
"to": {
"type": "array",
"items": {
"type": "string",
"format": "email"
},
"description": "List of recipient email addresses"
},
"subject": {
"type": "string",
"description": "Email subject"
},
"body": {
"type": "string",
"description": "Email body content (used for text/plain or when htmlBody not provided)"
},
"htmlBody": {
"type": "string",
"description": "HTML version of the email body"
},
"mimeType": {
"type": "string",
"enum": ["text/plain", "text/html", "multipart/alternative"],
"default": "text/plain",
"description": "Email content type"
},
"cc": {
"type": "array",
"items": {
"type": "string",
"format": "email"
},
"description": "List of CC recipients"
},
"bcc": {
"type": "array",
"items": {
"type": "string",
"format": "email"
},
"description": "List of BCC recipients"
},
"threadId": {
"type": "string",
"description": "Thread ID to reply to"
},
"inReplyTo": {
"type": "string",
"description": "Message ID being replied to"
}
},
"required": ["to", "subject", "body"]
}
```
* **Scopes**: `https://www.googleapis.com/auth/gmail.compose`
* **Interceptors**:
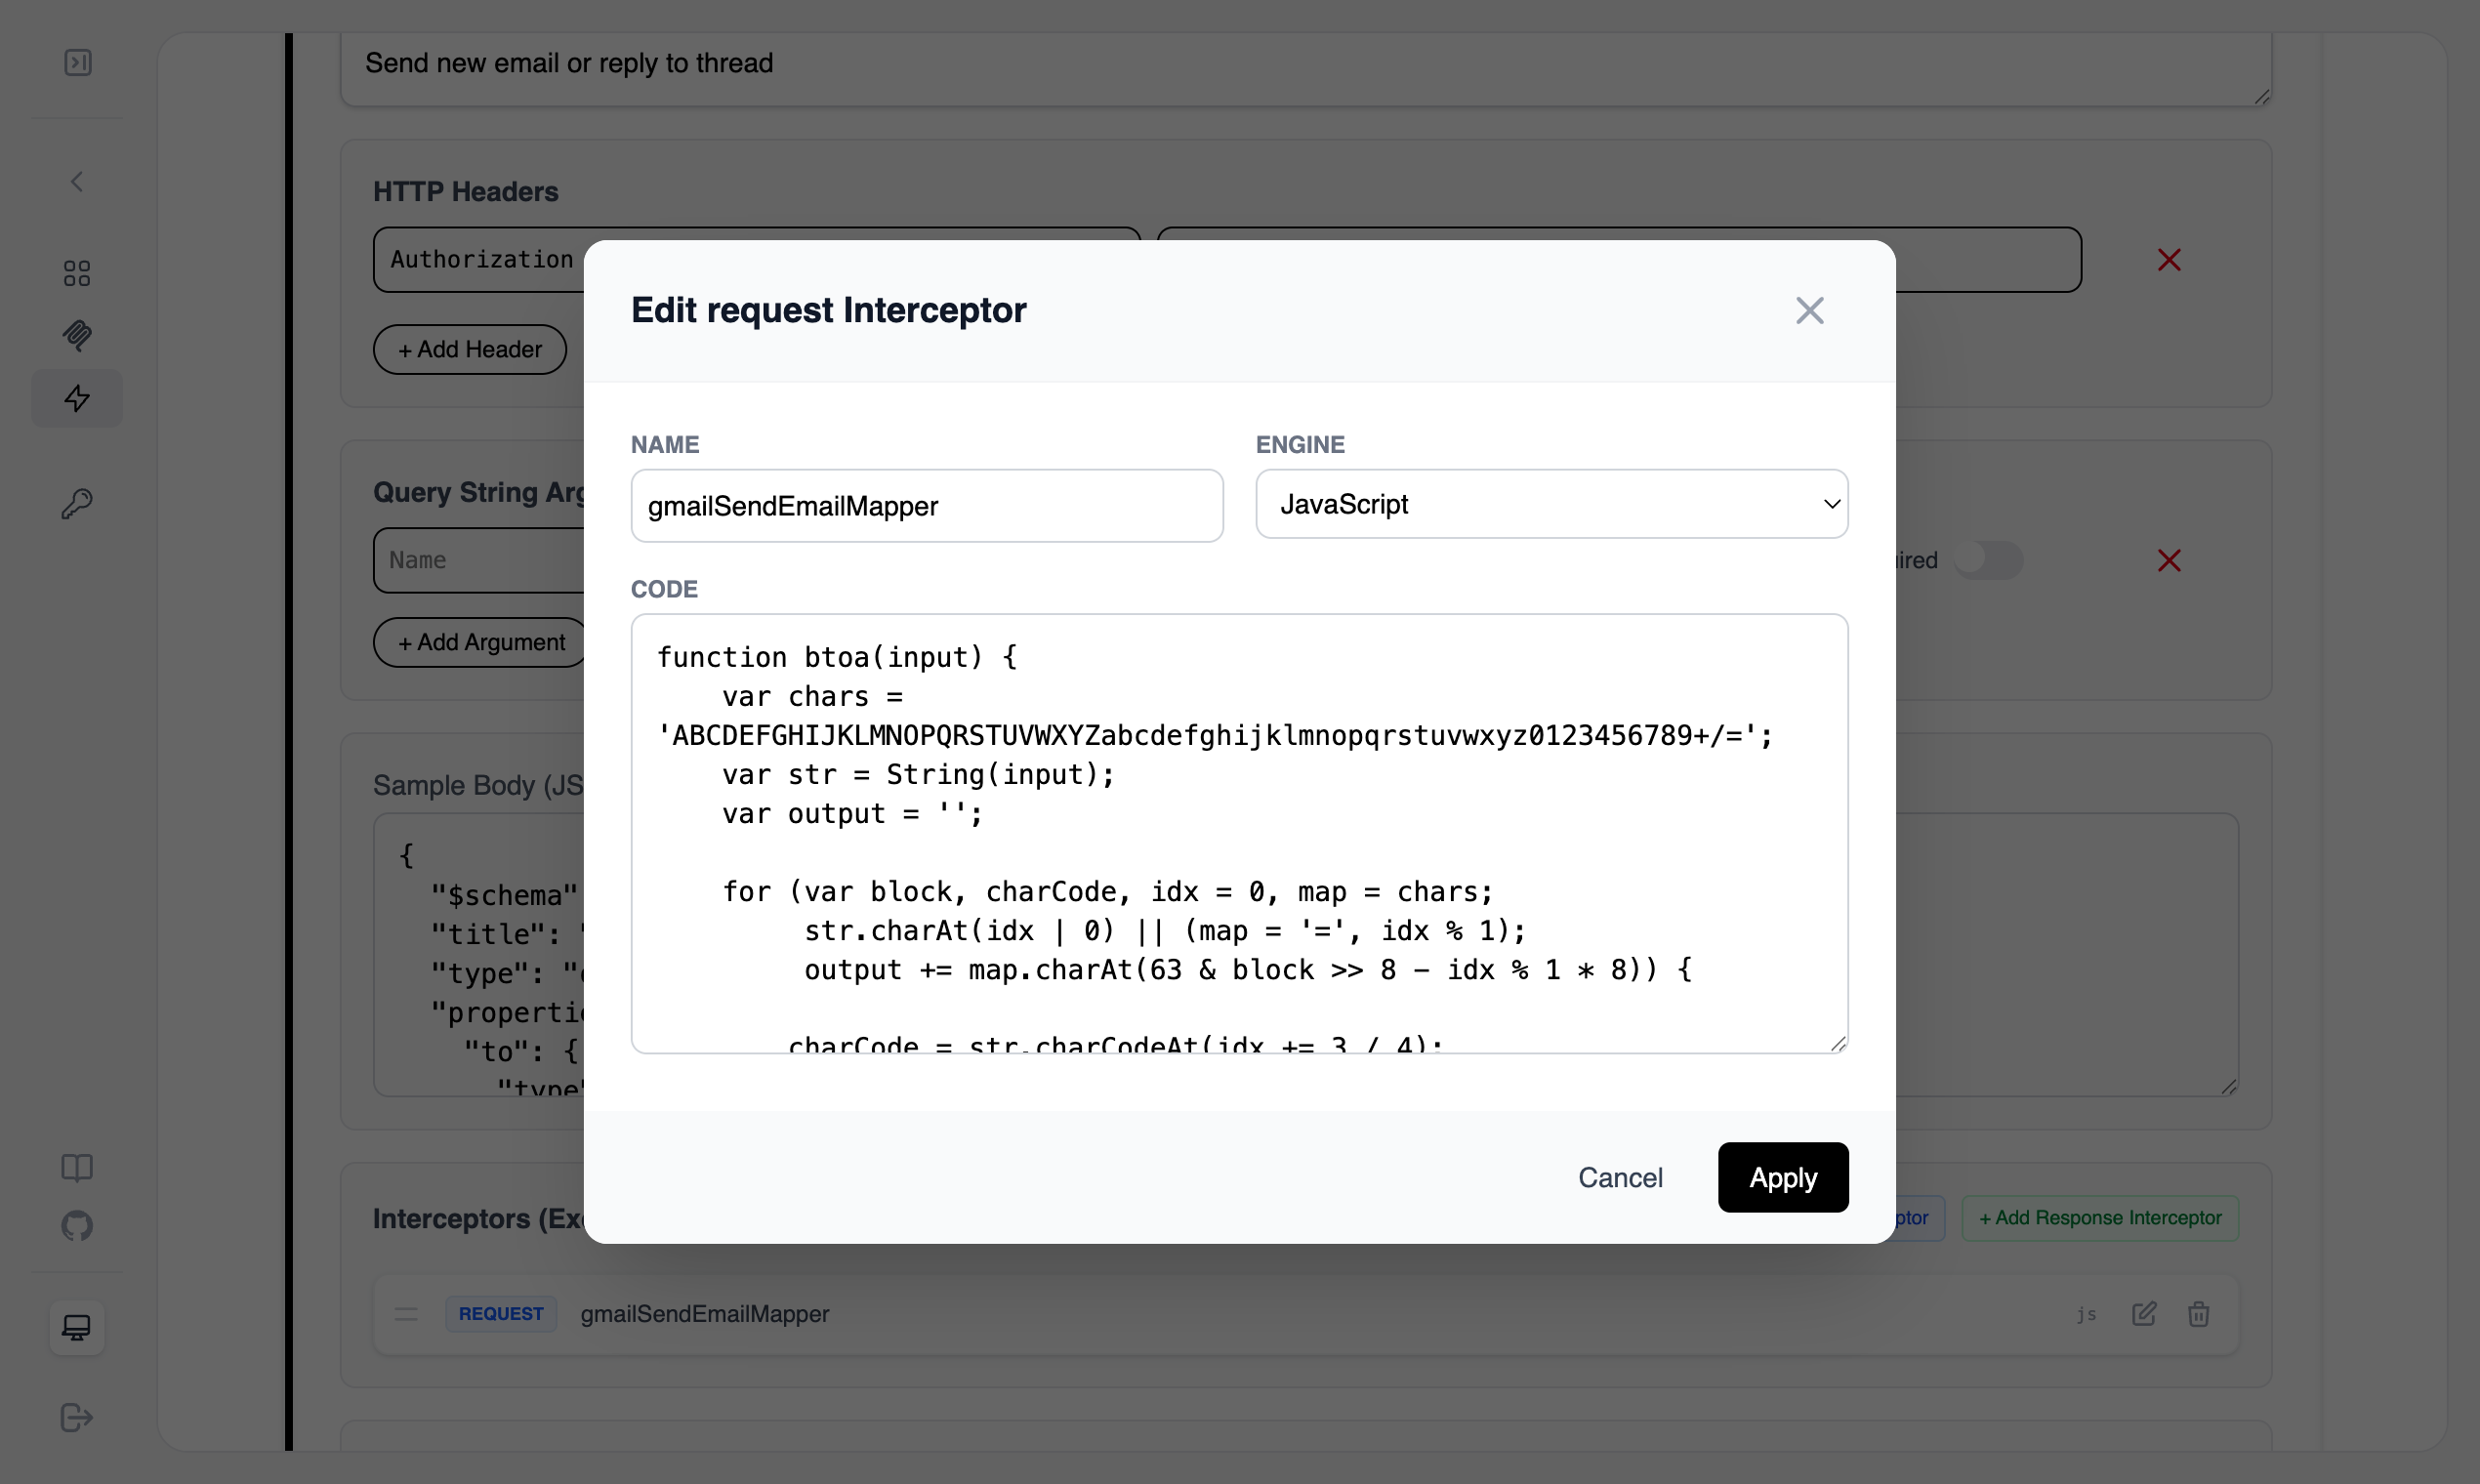
For sending email, the input has to be converted into a base64 format in a
specific order. I used a GoJa (JavaScript) interceptor to get inputs like a
real REST API then converted it to the desired format before sending to the
Gmail server. Unfortunately, the GoJa interceptor does not have native
support for base64, for that reason the example code snippet also includes a
`btoa` function.
Click on `Add Request Interceptor` button, on the popup window as name use `gmailSendEmailMapper` and the following code snippet:
```js theme={null}
function btoa(input) {
var chars =
"ABCDEFGHIJKLMNOPQRSTUVWXYZabcdefghijklmnopqrstuvwxyz0123456789+/=";
var str = String(input);
var output = "";
for (
var block, charCode, idx = 0, map = chars;
str.charAt(idx | 0) || ((map = "="), idx % 1);
output += map.charAt(63 & (block >> (8 - (idx % 1) * 8)))
) {
charCode = str.charCodeAt((idx += 3 / 4));
if (charCode > 0xff) {
throw new Error(
"'btoa' failed: The string to be encoded contains characters outside of the Latin1 range.",
);
}
block = (block << 8) | charCode;
}
return output;
}
var nl = "\r\n";
var boundary = "===============" + Date.now() + "==";
var headers = [];
// --- 1. Construct Headers ---
if (input.to && input.to.length > 0) {
headers.push("To: " + input.to.join(", "));
}
headers.push("Subject: " + (input.subject || ""));
if (input.cc && input.cc.length > 0) {
headers.push("Cc: " + input.cc.join(", "));
}
if (input.bcc && input.bcc.length > 0) {
headers.push("Bcc: " + input.bcc.join(", "));
}
if (input.inReplyTo) {
headers.push("In-Reply-To: " + input.inReplyTo);
headers.push("References: " + input.inReplyTo);
}
headers.push("MIME-Version: 1.0");
// --- 2. Construct Body (MIME) ---
var bodyContent = "";
if (input.htmlBody && input.body) {
// Both Plain Text and HTML -> multipart/alternative
headers.push(
'Content-Type: multipart/alternative; boundary="' + boundary + '"',
);
bodyContent += "--" + boundary + nl;
bodyContent += 'Content-Type: text/plain; charset="UTF-8"' + nl + nl;
bodyContent += input.body + nl + nl;
bodyContent += "--" + boundary + nl;
bodyContent += 'Content-Type: text/html; charset="UTF-8"' + nl + nl;
bodyContent += input.htmlBody + nl + nl;
bodyContent += "--" + boundary + "--";
} else if (input.htmlBody) {
// HTML only
headers.push('Content-Type: text/html; charset="UTF-8"');
bodyContent = input.htmlBody;
} else {
// Plain Text only (default)
headers.push('Content-Type: text/plain; charset="UTF-8"');
bodyContent = input.body || "";
}
var fullMessage = headers.join(nl) + nl + nl + bodyContent;
// --- 3. Encode to Base64URL ---
// We use encodeURIComponent + unescape to handle UTF-8 characters correctly before btoa
var encoded = btoa(unescape(encodeURIComponent(fullMessage)));
// Replace characters for Base64URL format (+ -> -, / -> _, remove padding =)
var raw = encoded.replace(/\+/g, "-").replace(/\//g, "_").replace(/=+$/, "");
// --- 4. Construct Output ---
var result = {
raw: raw,
};
if (input.threadId) {
result.threadId = input.threadId;
}
result;
```
```json theme={null}
{
snippet: snippet,
subject: payload.headers[?name=='Subject'].value | [0],
from: payload.headers[?name=='From'].value | [0],
to: payload.headers[?name=='To'].value | [0],
cc: payload.headers[?name=='Cc'].value | [0] || '',
date: payload.headers[?name=='Date'].value | [0],
threadId: threadId
}
```
* **Method**: `POST`
* **Path**: `/users/me/messages/send`
* **Name**: `sendEmail`
* **Description**: `Send an email.`
* **Body**: Enter the following **JSON Payload**.
```json theme={null}
{
"$schema": "http://json-schema.org/draft-07/schema#",
"title": "Email Schema",
"type": "object",
"properties": {
"to": {
"type": "array",
"items": {
"type": "string",
"format": "email"
},
"description": "List of recipient email addresses"
},
"subject": {
"type": "string",
"description": "Email subject"
},
"body": {
"type": "string",
"description": "Email body content (used for text/plain or when htmlBody not provided)"
},
"htmlBody": {
"type": "string",
"description": "HTML version of the email body"
},
"mimeType": {
"type": "string",
"enum": ["text/plain", "text/html", "multipart/alternative"],
"default": "text/plain",
"description": "Email content type"
},
"cc": {
"type": "array",
"items": {
"type": "string",
"format": "email"
},
"description": "List of CC recipients"
},
"bcc": {
"type": "array",
"items": {
"type": "string",
"format": "email"
},
"description": "List of BCC recipients"
},
"threadId": {
"type": "string",
"description": "Thread ID to reply to"
},
"inReplyTo": {
"type": "string",
"description": "Message ID being replied to"
}
},
"required": ["to", "subject", "body"]
}
```
* **Scopes**: `https://www.googleapis.com/auth/gmail.compose`
* **Interceptors**:
For sending email, the input has to be converted into a base64 format in a
specific order. I used a GoJa (JavaScript) interceptor to get inputs like a
real REST API then converted it to the desired format before sending to the
Gmail server. Unfortunately, the GoJa interceptor does not have native
support for base64, for that reason the example code snippet also includes a
`btoa` function.
Click on `Add Request Interceptor` button, on the popup window as name use `gmailSendEmailMapper` and the following code snippet:
```js theme={null}
function btoa(input) {
var chars =
"ABCDEFGHIJKLMNOPQRSTUVWXYZabcdefghijklmnopqrstuvwxyz0123456789+/=";
var str = String(input);
var output = "";
for (
var block, charCode, idx = 0, map = chars;
str.charAt(idx | 0) || ((map = "="), idx % 1);
output += map.charAt(63 & (block >> (8 - (idx % 1) * 8)))
) {
charCode = str.charCodeAt((idx += 3 / 4));
if (charCode > 0xff) {
throw new Error(
"'btoa' failed: The string to be encoded contains characters outside of the Latin1 range.",
);
}
block = (block << 8) | charCode;
}
return output;
}
var nl = "\r\n";
var boundary = "===============" + Date.now() + "==";
var headers = [];
// --- 1. Construct Headers ---
if (input.to && input.to.length > 0) {
headers.push("To: " + input.to.join(", "));
}
headers.push("Subject: " + (input.subject || ""));
if (input.cc && input.cc.length > 0) {
headers.push("Cc: " + input.cc.join(", "));
}
if (input.bcc && input.bcc.length > 0) {
headers.push("Bcc: " + input.bcc.join(", "));
}
if (input.inReplyTo) {
headers.push("In-Reply-To: " + input.inReplyTo);
headers.push("References: " + input.inReplyTo);
}
headers.push("MIME-Version: 1.0");
// --- 2. Construct Body (MIME) ---
var bodyContent = "";
if (input.htmlBody && input.body) {
// Both Plain Text and HTML -> multipart/alternative
headers.push(
'Content-Type: multipart/alternative; boundary="' + boundary + '"',
);
bodyContent += "--" + boundary + nl;
bodyContent += 'Content-Type: text/plain; charset="UTF-8"' + nl + nl;
bodyContent += input.body + nl + nl;
bodyContent += "--" + boundary + nl;
bodyContent += 'Content-Type: text/html; charset="UTF-8"' + nl + nl;
bodyContent += input.htmlBody + nl + nl;
bodyContent += "--" + boundary + "--";
} else if (input.htmlBody) {
// HTML only
headers.push('Content-Type: text/html; charset="UTF-8"');
bodyContent = input.htmlBody;
} else {
// Plain Text only (default)
headers.push('Content-Type: text/plain; charset="UTF-8"');
bodyContent = input.body || "";
}
var fullMessage = headers.join(nl) + nl + nl + bodyContent;
// --- 3. Encode to Base64URL ---
// We use encodeURIComponent + unescape to handle UTF-8 characters correctly before btoa
var encoded = btoa(unescape(encodeURIComponent(fullMessage)));
// Replace characters for Base64URL format (+ -> -, / -> _, remove padding =)
var raw = encoded.replace(/\+/g, "-").replace(/\//g, "_").replace(/=+$/, "");
// --- 4. Construct Output ---
var result = {
raw: raw,
};
if (input.threadId) {
result.threadId = input.threadId;
}
result;
```
 ***
## Step 4: Generate and Authenticate
Go to the **Providers** list.
Click the **Generate MCP Server** icon next to `gmail`.
On the Server page, click **Generate Token**.
**Important**: A popup will appear asking you to log in to Google. Grant the
requested permissions.
Once authenticated, copy the **Connection Address** into your MCP client
configuration (e.g., `claude_desktop_config.json`).
***
## Step 5: Real-Time Observability
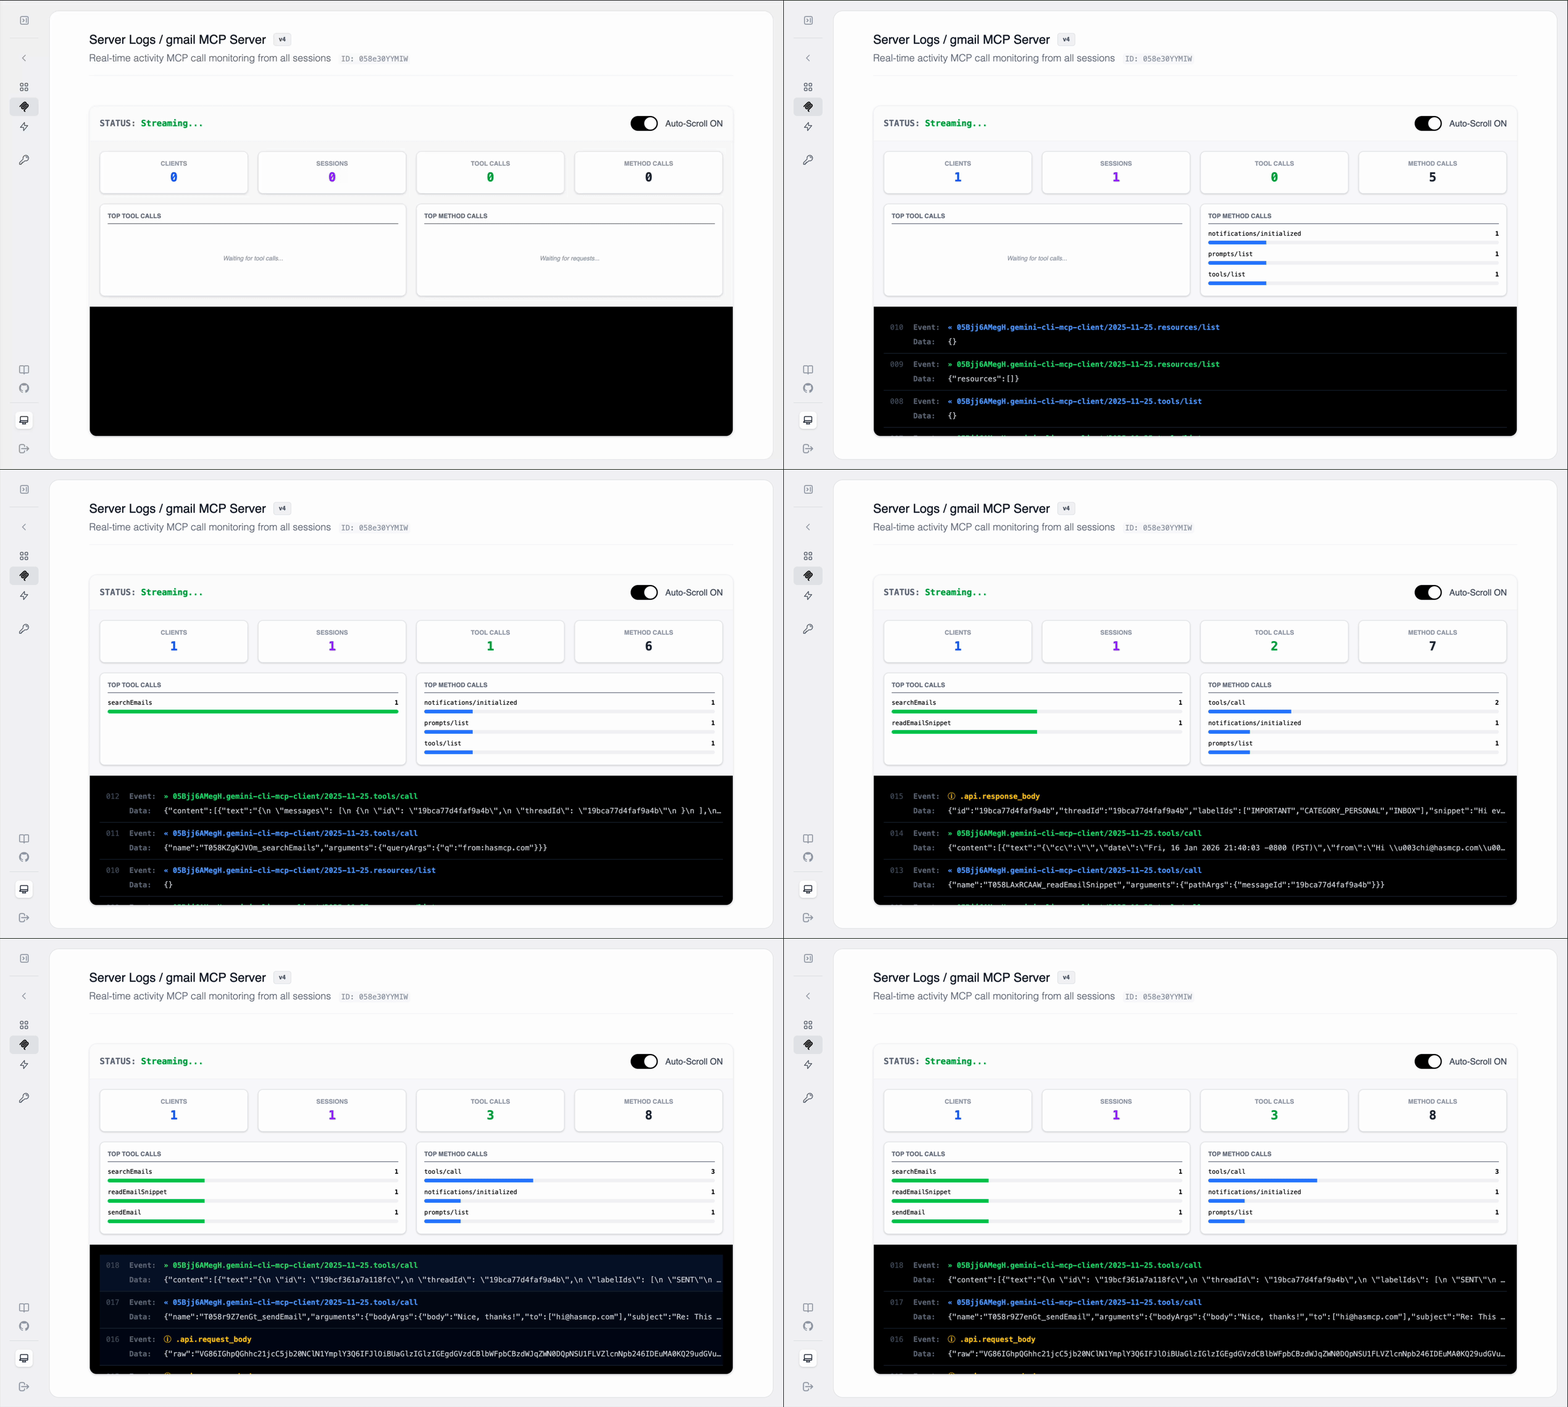
Since we are dealing with complex authentication and raw data formats, observability is critical to debugging.
Open the **Server Logs** tab in HasMCP.
Ask your MCP Client: *"Search for the last email from hasmcp.com."*
Watch the logs: - You will see the request hit `/users/me/messages` with
`q=from:hasmcp.com`. - You will see the JSON response from Google listing
message IDs.
Ask your MCP Client: *"Send an email to me saying Hello."* - You will see
the Model attempt to construct the `raw` base64 string.
***
## Step 4: Generate and Authenticate
Go to the **Providers** list.
Click the **Generate MCP Server** icon next to `gmail`.
On the Server page, click **Generate Token**.
**Important**: A popup will appear asking you to log in to Google. Grant the
requested permissions.
Once authenticated, copy the **Connection Address** into your MCP client
configuration (e.g., `claude_desktop_config.json`).
***
## Step 5: Real-Time Observability
Since we are dealing with complex authentication and raw data formats, observability is critical to debugging.
Open the **Server Logs** tab in HasMCP.
Ask your MCP Client: *"Search for the last email from hasmcp.com."*
Watch the logs: - You will see the request hit `/users/me/messages` with
`q=from:hasmcp.com`. - You will see the JSON response from Google listing
message IDs.
Ask your MCP Client: *"Send an email to me saying Hello."* - You will see
the Model attempt to construct the `raw` base64 string.
 ## Conclusion
You have successfully connected a high-security OAuth2 API to an MCP server that has complete observability.
```
```
## Conclusion
You have successfully connected a high-security OAuth2 API to an MCP server that has complete observability.
```
```